2020. 6. 2. 19:54ㆍJavascript/자료구조
1. 순차 선형 리스트
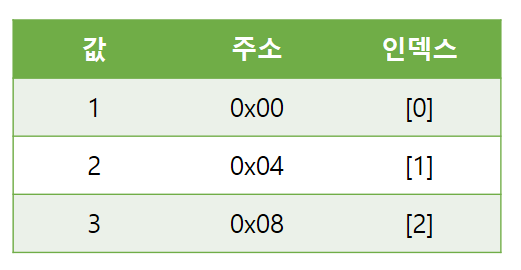
나는 C, 파이썬, 자바 그리고 자바스크립트를 배웠다. 이 네 개의 언어를 배우면서 느낀 점이 있다면, 여러 개의 데이터를 한꺼번에 저장하는 방법을 배울 때 가정 먼저 배열을 배운다는 것이다. 이 배열을 자료구조에서는 순차 선형 리스트라고 한다.
순차 선형 리스트는 논리적이고 물리적인 순서가 같아서 원소의 위치에 대한 접근성이 쉽다는 장점이 있다. 하지만, 삽입, 삭제 연산 후에 원소들을 이동시키는 추가적인 작업과 시간이 필요하다는 것이 단점이다.
또한, 순차 선형 리스트는 삽입 삭제 연산이 엄청나게 많을 경우, 원소들의 이동작업도 그에 따라 비례한다. 이는 오버헤드 증가를 초래하여 성능상의 문제를 일으킬 수 있기 때문에 배열이 갖고 있는 메모리 사용의 비효율성 문제를 그대로 갖고 있다.
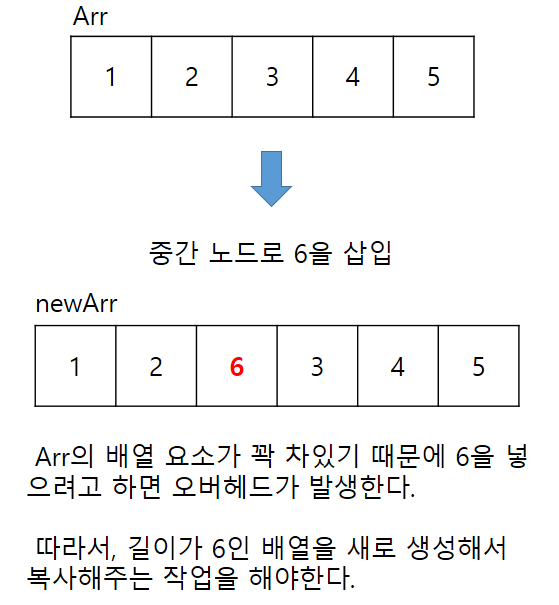
//중간 노드 삽입하기[선형 순차 리스트]

const arr = [1, 2, 3, 4, 5];
const result = Array(6).fill(0);
let j = 0;

for(let i=0; i<result.length; i++){
  if(i === 2){
    result[i] = 6
    continue;
  }
  result[i] = arr[j++];
}

console.log(result);
2. 연결 리스트
순차 선형 리스트 방식에서의 연산 시간 문제와 오버헤드 문제를 개선한 자료 표현 방식으로 연결리스트 방식이 있다. 연결 리스트는 순차 선형 리스트처럼 논리적이고 물리적인 순서가 필요없다. 왜냐하면 연결 리스트는 각 원소에 저장되어 있는 주소에 대한 참조에 의해서 연결되는 방식이기 때문이다. 그래서 순서를 맞추기 위한 오버헤드도 발생하지 않는다.
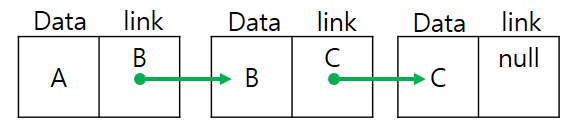
연결 리스트 방식에서 원소는 연결될 다음 원소에 대한 주소를 저장해야 하기 때문에 <원소, 주소> 단위로 저장해야 한다. 여기서 쓰이는 단위구조를 노드라고 한다. 노드는 데이터 필드와 다음 노드의 주소를 저장하는 링크 필드로 구성된다.
const Node = function(data){
   this.data = data;	// 데이터 필드
   this.link = null;	// 링크 필드
}
설명을 보충하기 위해 예시를 들어보자.
A, B, C 세 사람 순서대로 인간기차를 만든다고 가정해보자.
A 뒤에는 B가, B 뒤에는 C가 있을 것이고, 기차는 다음과 같은 구조를 이룰 것이다.
A -> B -> C
이를 노드로 나타내면 다음과 같다.
각 참조 값을 나타내면 다음과 같이 나타낼 수 있다.
A: A
B: A.link
C: A.link.link
3, 연결리스트의 연산
연결리스트의 대략적인 정의와 노드에 대해 알아보았으니 이제 연산에 대해서 알아보려고 한다. 이 포스팅에서 다룰 연산은 다음과 같다.
Add: 노드 추가
insertFirstNode: 첫 노드에 삽입
insertMiddleNode: 중간 노드 삽입
remove: 마지막 노드 삭제
delete: 중간 노드 삭제
연결리스트에 데이터를 추가, 삭제, 삽입 연산을 하기 위해서는 탐색과정이 필요하다. 탐색에서는 출발지와 끝이 있기 마련이다. 그리고 출발지는 시작의 기준이 된다. 그래서 나는 head라는 변수를 만들고, 이 변수를 기준으로 탐색을 할 것이다.
따라서 연결리스트의 뼈대는 다음과 같다.
const LinkedList = function(){
   this.head = null; // 처음에 아무 노드도 없어므로 null로 초기화
   this.length = 0; // 연결리스트이 길이
}
이제 뼈대를 만들었으니, 연산 기능을 추가하려고 한다. 첫 번째로 추가할 연산은 Add(노드 추가) 작업이다.
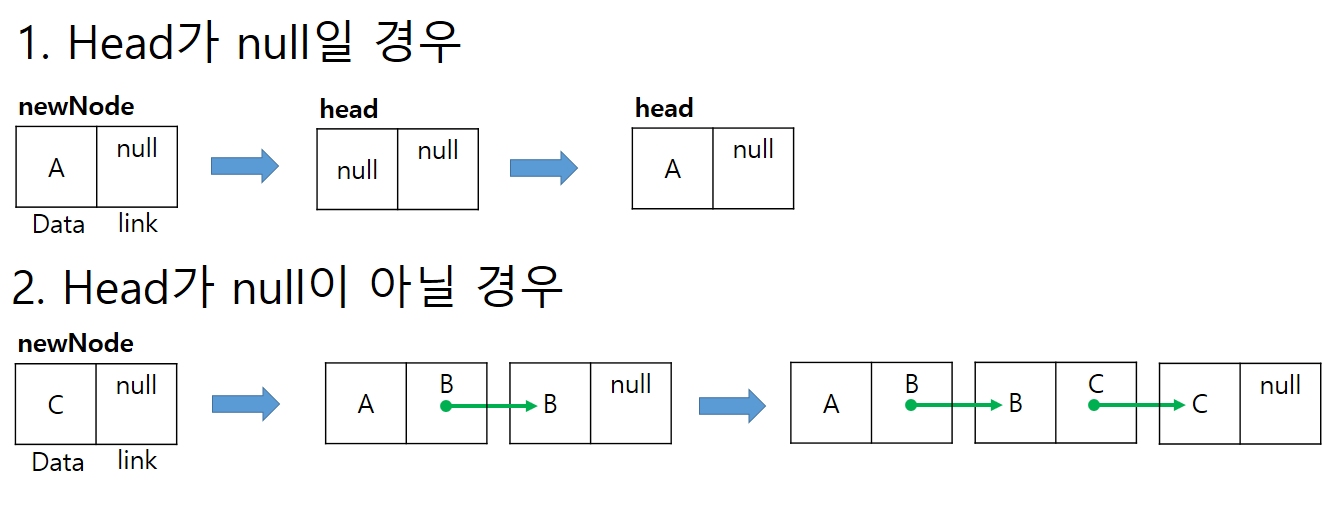
노드 추가 연산은 두 가지의 조건으로 나뉜다.
1. head가 null일 때
2. head가 null이 아닐 때
head가 null일 경우 노드를 생성해서 head에 넣어주면 된다. 하지만 head가 아닐 경우, head가 가리키는 다음노드의 참조 값이 null이 될때까지 탐색작업을 한 후, 마지막 노드가 가리키는 참조값(link)에 새 노드를 대입해주면 된다.
코드는 다음과 같다.
LinkedList.prototype.add = function(data){
  const newNode = new Node(data);
  if(this.head === null){
    this.head = newNode;
    this.length++;
  }
  else{
    let currentNode = this.head;
    while(currentNode.link !== null){
      currentNode = currentNode.link;
    }
    currentNode.link = newNode;
    this.length++;
  }
}
삽입, 삭제는 결과는 다르지만 과정은 모두 똑같다. 단 두가지의 과정만 거치면 된다.
1. 탐색
2. 연산
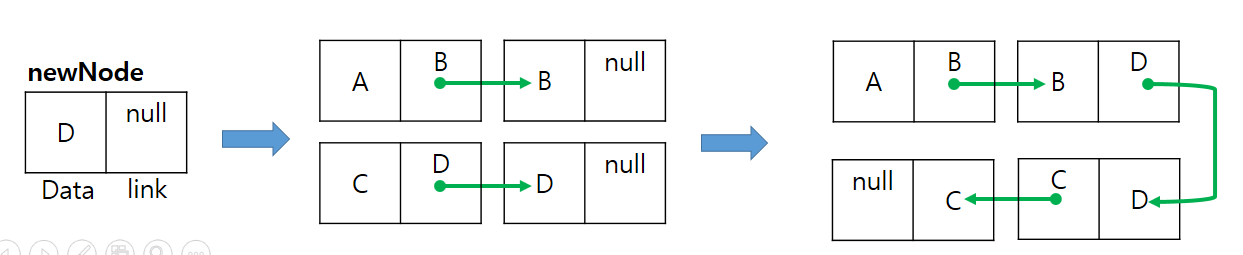
중간 노드 삽입을 예로 들어보자.
연결리스트에 A -> B -> C 순서대로 데이터가 들어있고, 우리는 D라는 데이터를 B와 C사이에 삽입하려고 한다.
그렇다면 매개변수로 무엇이 필요할까?
B라는 키워드가 필요하고, 새로 넣을 값 D를 필요로 하다.
왜냐하면, B가 가리키는 참조값(link)을 D가 들어있는 새 노드를 가리켜야 A -> B -> D의 순서가 되기 때문이다.
그와 동시에 우리는 D가 다음으로 가리키는 참조값(link)를 C를 가르키게끔 해야한다.
즉, B.link와 D.link를 스와핑 작업을 해주면 된다.
프로그램은 다음과 같다.
첫 노드 자리 삽입
LinkedList.prototype.insertFirstNode = function(data){
  const newNode = new Node(data);
  newNode.link = this.head;
  this.head = newNode;
  this.length++;
}
중간 노드 자리 삽입
LinkedList.prototype.insertMiddleNode = function(pre, data){
  const newNode = new Node(data);
  let currentNode = this.head;

  while(currentNode.data !== pre)
    currentNode = currentNode.link;

  let temp = currentNode.link;
  newNode.link = temp;
  currentNode.link = newNode;
  this.length++;
}
마지막 노드 제거
LinkedList.prototype.remove = function(){
  let currentNode = this.head;
  while(currentNode.link.link !== null)
    currentNode = currentNode.link;
  currentNode.link = null;
  this.length--;
}
중간 노드 제거
 if(currentNode.data !== data){
    while(currentNode.link.data !== data)
      currentNode = currentNode.link;
    temp = currentNode.link.link;
    currentNode.link.link = null;
    currentNode.link = temp;
  }
  else{
    temp = currentNode.link;
    currentNode.link = null;
    this.head = temp;
  }
  this.length--;
}
4. 프로그램 코드
전체 프로그램 코드는 다음과 같다.
const Node = function(data){
  this.data = data;
  this.link = null;
}

const LinkedList = function(){
  this.length = 0;
  this.head = null;
}

LinkedList.prototype.add = function(data){
  const newNode = new Node(data);
  if(this.head === null){
    this.head = newNode;
    this.length++;
  }
  else{
    let currentNode = this.head;
    while(currentNode.link !== null){
      currentNode = currentNode.link;
    }
    currentNode.link = newNode;
    this.length++;
  }
}

LinkedList.prototype.insertFirstNode = function(data){
  const newNode = new Node(data);
  newNode.link = this.head;
  this.head = newNode;
  this.length++;
}

LinkedList.prototype.insertMiddleNode = function(pre, data){
  const newNode = new Node(data);
  let currentNode = this.head;

  while(currentNode.data !== pre)
    currentNode = currentNode.link;

  let temp = currentNode.link;
  newNode.link = temp;
  currentNode.link = newNode;
  this.length++;
}

LinkedList.prototype.remove = function(){
  let currentNode = this.head;
  while(currentNode.link.link !== null)
    currentNode = currentNode.link;
  currentNode.link = null;
  this.length--;
}

LinkedList.prototype.delete = function(data){
  let currentNode = this.head;
  let temp;

  if(currentNode.data !== data){
    while(currentNode.link.data !== data)
      currentNode = currentNode.link;
    temp = currentNode.link.link;
    currentNode.link.link = null;
    currentNode.link = temp;
  }
  else{
    temp = currentNode.link;
    currentNode.link = null;
    this.head = temp;
  }
  this.length--;
}

LinkedList.prototype.showData = function(){
  let currentNode = this.head;
  const result = Array(this.length).fill(0);
  for(let i=0; i<this.length; i++){
    result[i] = currentNode.data;
    currentNode = currentNode.link;
  }
  return result;
}

const linkedList = new LinkedList();
console.log("Add: 마지막 노드로 삽입하기");
linkedList.add("토마토");
linkedList.add("감자");
linkedList.add("배추");
console.log(linkedList.showData());

console.log("\nApply insertFirstNode: 첫 번째 노드로 삽입하기");
linkedList.insertFirstNode("고구마");
console.log(linkedList.showData()); //출력

console.log("\n insertMiddleNode: 중간 노드로 삽입하기");
linkedList.insertMiddleNode("토마토", "양배추");
console.log(linkedList.showData());

console.log("\n delete: 첫 번째 노드 제거하기")
linkedList.delete("고구마");
console.log(linkedList.showData()); //출력

console.log("\n delete: 중간 노드 제거하기")
linkedList.delete("양배추");
console.log(linkedList.showData()); //출력

console.log("\n Remove: 마지막 노드를 제거하기");
linkedList.remove();
console.log(linkedList.showData()); //출력
5. 참고 자료
1. 자바로 배우는 쉬운 자료구조, 한빛미디어
3. <h1> Code Playground </h1> - [JS/Linked List] 자바스크립트로 Single Linked List 구현하기
'Javascript > 자료구조' 카테고리의 다른 글
| [JS] 이진 탐색 트리 (0) | 2020.06.12 |
|---|---|
| [JS] 이진트리와 순회 (0) | 2020.06.09 |
| [JS] 병합 정렬 (0) | 2020.06.02 |
| [JS] 퀵 정렬 (0) | 2020.06.01 |
| [JS] 삽입 정렬 (0) | 2020.05.31 |